Tradesteady Algo – How to Use
Step-by-step guide for using Tradesteady Algo. Last updated: March 2026.
Paper trading (simulation) — full reference (spot/futures; not MT5; separate from Options Analytics).
1. Get Started
- Open https://www.tradesteadyalgo.com
- Click Login or Register to create a free account
- After login you land on the Dashboard
For TradingView Automation (your own TradingView alerts): TradingView Essential (basic paid plan) is required for using webhooks and alerts.
2. TradingView Automation Flow (Your Own TradingView Alerts)
Step 1 – Add Destination
- In the Dashboard, go to Destinations (or Webhooks if you have none yet)
- Click Add Destination
- Choose destination type and fill in API keys (or check Paper trading). “My Strategy”) and optional description
- Click Create Route
Your automation URL is created automatically. Find it in the Webhooks tab to paste into TradingView (Step 4).
Step 2 – Create Route(s) (Destinations)
- Go to Dashboard → Destinations
- Click Create Route
- If you have multiple automations, select the one to use
- Choose Destination Type. For paper (simulation): Binance, Bybit, Delta, Fyers, or Dhan — check “Paper trading (simulation)” (no API keys; price from alert). MT5 is live-only, not paper.
- For live Binance/Delta/Bybit: enter API Key and Secret in the form
- For live MT5: pick MetaTrader, enter your MT5 Account ID (and optionally broker name, EA name)
- Click Create Route
You can create multiple routes for one webhook (e.g. Binance Futures + MT5).
Step 3 – Set Up Exchange / MetaTrader (Live Only)
Exchange (Spot or Futures): Create an API key in your exchange’s API Management. Enable Read + Trading only (do not enable withdrawals). Paste Key and Secret in the route form. Use Testnet first if you prefer.
MetaTrader: In Dashboard → API Keys, download the MetaTrader EA. Install it in MetaTrader. In the EA inputs, set Server URL (e.g. https://www.tradesteadyalgo.com) and, if needed, Account ID. By default, Account ID is not required if the EA runs on the same MetaTrader account as the one you used in the Route. Attach the EA to a chart and allow AutoTrading; it will poll the server for commands.
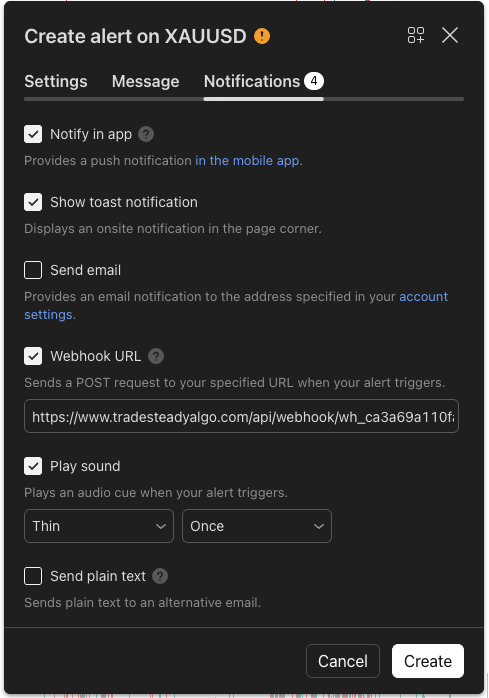
Step 4 – Create an Alert in TradingView
- Open TradingView and your chart (e.g. BTCUSDT, XAUUSD)
- Click the Alert (bell) button → Create Alert
- Set your condition (e.g. strategy or indicator)
- Under Notifications, enable Webhook URL and paste your Tradesteady webhook URL
- In Message tab, use a format Tradesteady understands (see examples below)
- Save the alert
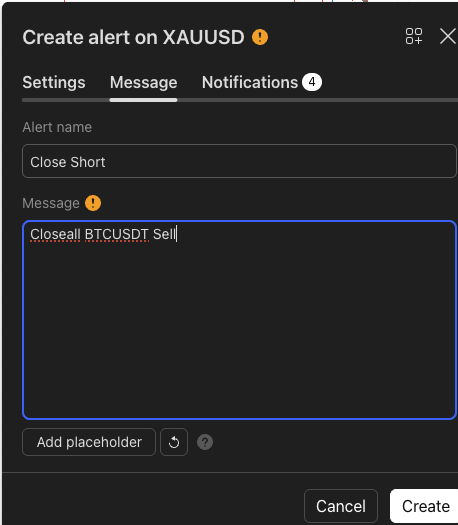
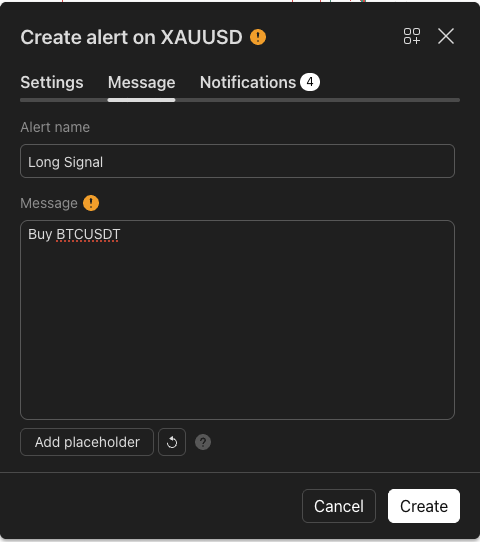
Message formats: Strategy: Long {{ticker}} Q={{strategy.order.contracts}} SL=2% TP=5% · Or: Buy BTCUSDT Q=0.01 R=binance_futures (R= route/destination)
When the alert fires, TradingView sends the message to your webhook; Tradesteady executes the trade on the route(s) linked to that webhook.
3. Paper Trading (Free Simulation)
- In the Dashboard, if you have not already, click Activate Paper Trading (banner or prompt)
- Create a webhook and a route with “Paper trading (simulation)” checked
- Choose destination: Spot, Futures, Exchange (global or India). MetaTrader is not available for paper trading
- No API keys needed. Set up your TradingView alert with the same webhook URL and message format
- Simulated trades appear under Paper Trades. You can refresh prices (rate-limited), see leverage/liquidation for futures, and close positions
4. MetaTrader-Specific
- Route: Destination Type = MetaTrader, enter MetaTrader Account ID (required). Broker name and EA name are optional.
- EA: Download from Dashboard → API Keys. In the EA inputs, set Server URL and, if needed, Account ID. By default, Account ID is not required if you use the same MetaTrader account in the EA as the one configured in the Route.
- Multiple MetaTrader accounts: Use
M= in the alert message, e.g. Buy XAUUSD Q=0.1 R=MT5 M=987654321, so the order goes to that account only.
5. Testing & Logs
- Test API (Binance/Delta routes): Use the “Test API” button on the route to verify credentials
- Test MetaTrader Connection: Use “Test Connection” on the MetaTrader route after the EA is running
- Alerts tab: View alert history and execution status
6. Help & Links
To save as PDF: use your browser’s Print (Ctrl+P / Cmd+P) and choose Save as PDF.